

It doesn't matter what you start with - pattern or fabric (Which came first, the chicken or the egg). You just need to like the combination you finally decide to sew with.
Patterns for any kind of sewing come many ways, in many sizes, at different levels of difficulty, and with directions written many ways. You need to do a little research before grabbing a pattern off the rack, out of the drawer, or ordering it online and printing it out.
Patterns are written very differently from designer to designer. The pattern can be one thing – a wall hanging, a baby quilt, a throw(Southwind Designs, Violet Craft animals). You can always enlarge a pattern by adding borders, enlarging the pattern, or repeating the block (may mean a lot of work). A more traditional pattern repeats one shape or block. It may offer you several sizes by having you make more or less blocks (Swirly Girls, JayBird Quilts). Some patterns have several different parts that can be combined or you can sew just one part (Elizabeth Hartman). You can take one component of the pattern and repeat it or enlarge it. Others have one block that can be combined to make several different looking quilts (Carolyn Freidlander).


When looking for a pattern to sew, look at the pattern design on the cover and check the back for yardage, sizes available, and a clear illustration of the project. Clothing patterns usually have a picture of the pattern in a simple line drawing. They show the front and back of the item to be made. Quilts may have a picture of the quilt in another size or colorway. If you like the design, but not the color of the sample on the front, remember you can change the color. Also decide if the techniques used are what you want to do. Have you done it before, or do you want to learn this? Set-in sleeves on a jacket or shirt, curves for a quilt, or foundation paper piecing are examples.


Once you have chosen the pattern, read the back carefully. Here you will learn how much fabric to buy. If there are multiple colors needed, it may tell you if you need contrast; light, medium, or dark shades; non-directional fabric, etc. For quilts it may tell you if pre-cuts will work – strips, fat quarters, charm squares. The back of the pattern will give you a list of other things you may need – buttons, specialty rulers, zippers, suggested weight of thread, etc.
If you are making a quilt, you can buy the fabric for the borders, binding, and backing after the center of the quilt is together. It may look very different than you imagined once together and a different border than you thought may work better. Keep in mind that the back is the back. It doesn’t have to match the front exactly. It can look good with the binding. It can be a whole second quilt.

You’ve bought your pattern, other needed items, and fabric.
Next steps:
Read ALL of the directions carefully. We all like directions presented differently. Some want to read them; some want illustrations to walk you through the process. Others prefer to see the technique taught visually and look for a YouTube video. Many would rather take a class to learn. Many designers are not good writers, their directions are hard to follow (We try to carry patterns with well laid out directions).

When reading the pattern look for how to press the seams after sewing. Also look at what the seam allowance should be for the pattern. ¼” or scant ¼” for quilting, 5/8” or other for clothing. How wide do they recommend cutting the binding strips (we’ll talk about binding in a future newsletter)? Do they give you hints about cutting pieces, have diagrams for cutting? Directions may say to cut three 2 ½” strips WOF. WOF is width of fabric, selvedge to selvedge. They may also say cut 3(6,9,12) strips. These numbers are for different sizes of quilts (just like knitting clothing directions). Look on the outside and see what the choices are small to large. The numbers tell you how many to cut for the sizes in increasing order. For example, you can make a baby, throw, twin, or double. So, 3 strips for a baby, 6 strips for a throw, and so on. If you are making a twin, circle/highlight the corresponding number within the parentheses.
If you don’t understand the directions there are a couple of things you can do, especially if you really love the pattern.
1) Re-read the directions carefully and slowly again. Highlight places with
specific directions – size and shape to cut, how to press after sewing,
which combinations to join. If the pattern has multiple sizes – highlight
the size you are doing. Write notes about what needs to be done, tips to
yourself.
2) Have a friend read the directions and help you
3) Ask us at the shop for help.


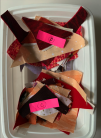
Get yourself organized before cutting. Make sure you know which fabric in the pattern goes with each of your fabrics. Pin labels to the fabric. Put the cuts in paper plates, write a label on the edge of the plate. Be ready to sort your fabric cuts to go along with the directions. They may have you make blocks by color, so keep the colors together. Your quilt may be rainbow themed or go from dark to light. They may say put two squares together and then attach them to a rectangle. Shape is more important here. Put all the same size squares on a plate, in a bag, or pinned together. This quilt may be scrappy in the end.

Want to step out of your comfort zone. Contact a designer and offer to be a pattern tester. Watch on Instagram and Facebook for calls for pattern testers. Or email the designer and offer. Let them know you like their patterns and want to test for them. Let them know you had trouble reading their directions on “X” pattern and would like to test in the future for them. Designers look for sewists of all ability levels. After quilting or sewing or cooking or learning for a while, some steps in a project are second nature to us. We need to be reminded that the leap from Step 1 to Step 6 needs to be spelled out. It’s like reminding ourselves that our partners can’t read our minds.


Patterns vs. Books. Patterns don't cost as much as a book in most cases. Patterns are usually one design, one technique. Books usually have several patterns around a topic. the topic can vary greatly. Pre-cuts: charms, Fat quarters; baby quilts; foundation paper piecing; English Paper Piecing are all examples of types of books. Some designers do only patterns, some mainly do books, and some do both. It's up to you to decide how many patterns you want at a time and what your budget will allow. If you have your heart set on a pattern or book you don't see in the shop, let us know and we will try to order it.
Several new blenders arrived this past week. Alison Glass, Libs Elliot, and Laundry Basket Quilts from Andover in bright, happy colors are in. A couple of baseball themed prints from QT Fabrics should be here any day.


Come in to cool off this week and start you holiday sewing projects.
Happy sewing everyone,
Phyllis and the QA staff